
Design a Birthday Invitation That Gets a “Yes!” in Under 5 Minutes
Picture this: you’re planning the perfect birthday celebration. You’ve thought of the theme, the guest list, and you’ve got that photo—the one that perfectly captures the spirit of the person or the party. Now, the only thing standing between you and sending out the invites is… actually making them.
If the thought of complex design software makes you want to close the laptop, take a deep breath. Creating a beautiful, photo-filled birthday invitation is easier than ever, and you can do it right from your web browser in just a few simple steps. Let me walk you through exactly how.
Why Your Invitation Needs a Personal Photo
Before we jump into the “how,” let’s talk about the “why.” Adding a personal photo does more than just make the invitation pretty. It:
- Sets the Tone Instantly: A fun, candid shot screams a casual party; a elegant portrait hints at a more formal affair.
- Creates Immediate Connection: Guests feel personally invited the moment they see a familiar, smiling face.
- Builds Anticipation: A great photo gets people excited before they even read the details.
Ready to create something your friends will love? Follow these simple steps.
Your Step-by-Step Guide to the Perfect Photo Invitation
Step 1: Find Your Creative Playground
Open your favorite web browser (like Chrome, Safari, or Edge). In the address bar at the top, type in cardmakerz.com and hit enter. This will take you directly to the home of user-friendly card design.
Step 2: Head to the Birthday Section
On the website’s main page, look for the navigation menu. You’ll see a link or button labeled something like “Birthday Invitation.” Give that a click. You’re now in the right neighborhood!
Step 3: Choose Your Starting Point (The Template)
You’ll be greeted by a gallery of pre-designed invitation templates. Don’t worry—these aren’t constraints, they’re your best friends. Browse through and click on the one that best fits your party’s vibe. Is it colorful and playful? Sleek and modern? Find your match and then click the “Start Design” or “Customize” button on that template.
Step 4: Make the Words Your Own
Now you’re in the design editor. See the text boxes on the invitation that say things like “Happy Birthday!” and “Join us for a celebration!”? Double-click directly on any of these text boxes. A cursor will appear, allowing you to edit. Change the text to your party’s specific details: the name, date, time, location, and any special instructions (like “No gifts, please!” or “Pool party—bring a towel!”).
Pro Tip: Edit each text field one by one. Take your time to get the information clear and accurate.
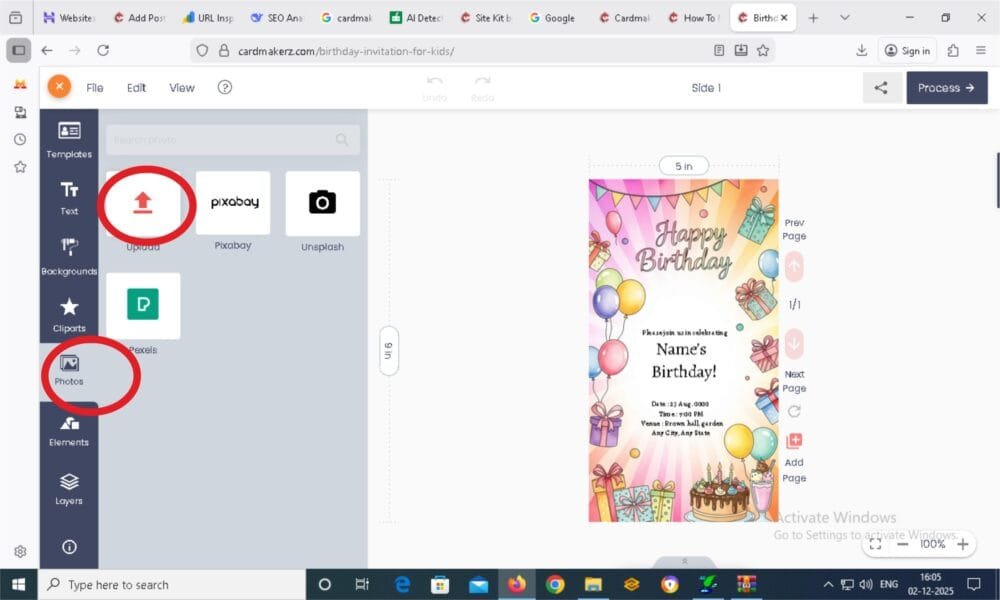
Step 5: Add the Star of the Show — Your Photo!
Look for the design panel, usually on the left or right side of the screen. Find and click the “Photo” or “Upload Image” icon. A window will open, allowing you to select the perfect photo from your computer. Click to upload it. You can then drag it into place, resize it, and make it the centerpiece of your design.
Step 6: Finalize and Save Your Masterpiece
Once every text box is perfect and your photo is shining, look for the “Process,” “Finish,” or “Next” button—typically in the top-left or top-right corner. Click it to proceed to the final stage.
Step 7: The Final Checkout
You’ll see a final summary screen. Here, you may need to fill in a few required fields, like your name or email. Most importantly, look for a checkbox that says something like, “I have read and agree to the terms and conditions.” Make sure to check this box. Finally, click the “Place Order” or “Download” button. Don’t worry—for a basic invitation, this is almost always free.
Step 8: Choose Your Format and Celebrate!
A last pop-up will likely ask you to choose your file format. Select JPEG (best for texting or emailing) or PDF (best for high-quality printing). Click “Confirm,” and your beautiful, custom birthday invitation will automatically save to your computer’s download folder!
Before You Hit Send: A Quick Checklist
- Proofread Everything: Date, time, address, spelling of names. Read it twice!
- Photo Quality: Is your uploaded image clear and not pixelated?
- File Format: Did you choose the right one for how you’re sending it (JPEG for digital, PDF for print)?
And that’s it! In less than five minutes, you’ve gone from a blank screen to a personalized, professional-looking invitation that’s ready to make your guests smile. No design degree required—just a great photo and a few clicks.
Now, go plan that amazing party